How to install the parquet
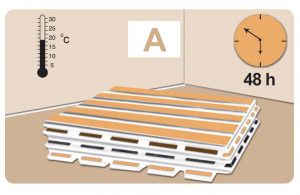
Installing laminate flooring is the final phase of construction and is done after drying and complete loss of moisture in building materials.A necessary and main condition is that installation is done at least 60 days from the date of floor preparation and dry floor after confirmed by an expert and carry out moisture measurement tests.Let the planks acclimate for 48 hours in the unopened packaging in the cross form (warehouse layout) in the middle of the room where the floor is to be installed. Planks should be mixed from at least 3 cartons, inspect every plank before installing.Avoid installing damaged planks (damaged during transportation and inappropriate storage) (Fig. A).
Temperature of the air in the room before, during and after installation must be 16-22 °C and the relative humidity should be 40-60 %. The aforesaid conditions apply to storage of laminate flooring as well.
Materials & Tools Required:
– Hand or power saw and utility knife
– Carpenter’s square and measuring tape
– Drill, carpentry glue and pull bar
– Spacers for the creation of expansion spaces
– Hammer and impact pad (to prevent direct impacts to the edges)
– 51 mm wide moisture resistant adhesive tape
– Safety glasses and dust mask
– Laminate flooring
– (2 mm thickness) proper underlayment
– (0.2 mm thickness) polyethylene vapor barrier
– Silicon Sealing
– Skirting board (to provide for aesthetic aspects of the ending parts and to cover vacant spaces provided for expansion)
Calculate your total floor area, add 10 % to the room’s area to determine the laminate floor, underlay and polyethylene vapor barrier that you will require.
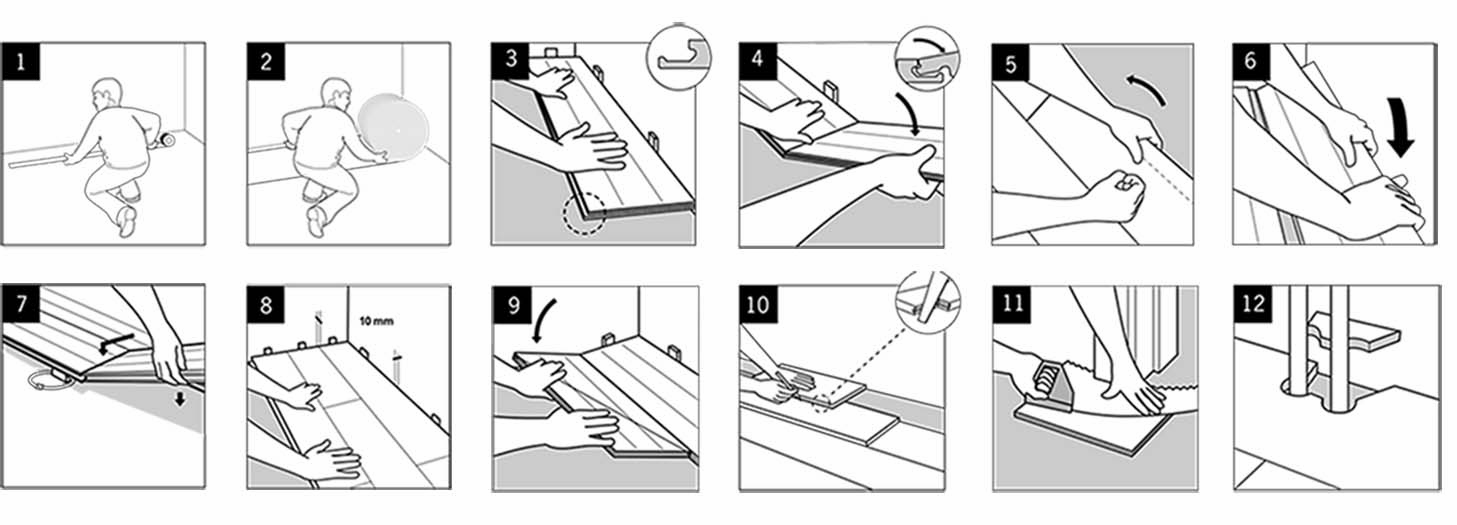
A) Remove any existing carpeting or wood flooring glued to a concrete floor. Ensure the floor is clean, flat and dry.Maximum unevenness shouldn’t exceed 2 mm per meter(Fig. B).
Note: Use underlay underneath the laminate floor. If installing over concrete or a concrete floor covered by mosaic first lay down polyethylene vapor barrier, sheeting should overlap at least 2 cm and seal with wide moisture resistant adhesive tape (Fig. 1).
Underlay edges should not be overlapped and butt end edges together. Compressed (Silent) underlay also is useful for cement and concrete floors and ordinary underlay be properly used for other floors as ceramic tiles and stone (Fig. 2).
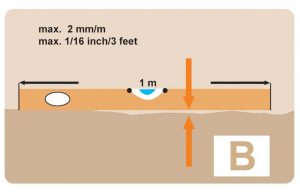
B) Measure the width of room and divide it by the width of a tile. If the remainder is 6 cm or smaller, for a proper width in the last row, you should cut the tongue edges from the first row of tiles.The length of the first tile in a row should not be less than 40 cm. Meanwhile, the seam of the tiles should be more than 40 cm from the seam of the row of tiles you have already installed (Fig. C)
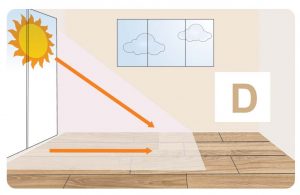
C) Start to install from left-hand corner, place the tiles in direction of sunlight so that longitudinal edges of tiles are parallel to the longitudinal side of the room (Fig. D).
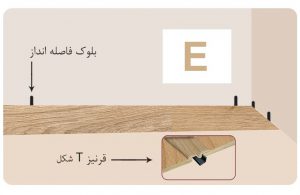
Note: The most ideal size to be covered is 10 m in length and 7 m in width, if the floor size is larger, transition molding will be required to divide the room area.Use spacers to create expansion space around the perimeter of the room,between the planks and any fixed objects (e.g. pipes, doorframes, cabinets, etc) (Fig. E).
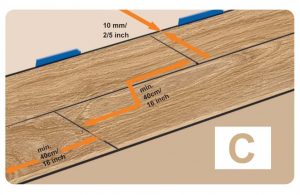
D) Clean the first row of tiles and cut off tongue of the planks and place this trimmed edge parallel to the wall using the expansion spacers (Fig. 3).
E) Install each sequential plank by inserting tongue end into the groove at 20-30 degree angle and slight pressing down ( Fig. 4).
F) When you reach the end of row, measure and trim the last plank to fit. According to angle of the cutting blade, set cutting side so that do not damage decor surface ( Fig. 5).
Note: planks should always be cut away from the installation area in order to keep dust from affecting the site. Always wear safety glasses and dust mask.
G) Lift the previously installed row slightly to enable you to snap the first adjacent plank into position (Fig. 6).
For subsequent planks, the short end is positioned at an angle to engage the planks (Fig. 7).
Then give the board a sharp tap with your hand to fully engage (Fig. 8).
and press down firmly (the impacts shouldn’t damage or break the clicks) (Fig. 9).
- H)To install the last row,trace the wall contour and cut the plank (Fig. 10).
- Note: Flooring should extend under the doorframe. Use a piece of scrap flooring to mark the depth that the doorframe should be trimmed (Fig. 11).
- I)Remove spacers, install wall base moldings without glue or nail them to the laminate flooring and cut any residual polyethylene vapor barrier over the moldings.
- Avoid sticking laminate flooring tiles unto underlayment.
Kitchen And Damp Places:
Laminate flooring is not recommended to be installed in damp areas. However, installation must be made in accordance with the following instructions.
Avoid installing cabinets on laminate flooring.Laminate flooring should be installed up to cabinets,leaving 8-10 mm expansion spaces. Fill all expansion spaces in wet area such as kitchen sinks and dishwashers with silicon caulking. Always apply some silicon sealing between the sole of wall base moldings and laminate flooring surface.
Radiant Heated Sub-Floor:
-In places where under-floor heating system is used, it is necessary to use special underlayment, which is made of natural cork or silent foam with aluminum layer.
-In areas that has under-floor heating system, before installing laminate flooring must be heated up until the moisture content of flooring is fully removed.
-The temperature must be at the highest level for 72 hours. Afterwards, reduce the temperature gradually. Under-floor heating should be working for at least 3 weeks to remove the floor moisture completely.
-Turn off the under-floor heating system two days before beginning installation. The temperature of the floor should be 16-22 °C before, during and 48 hours after installation.
-Installing laminate flooring is permitted on under-floor heating system only in case that heat is transmitted through the circulation of water and exists in all parts of the floor.
-Also ensure that the heat generated by the system is the same at any point of the floor.
-Maximum temperature of laminate flooring surface during use of under-floor heating system should be 27 °C and temperature of hot water should not exceed 60 °C.
-Turn on the under-floor heating system 48 hours after installing and increase the temperature gradually. (daily 5 °C )This process also applies at reduction the temperature.
Around Pipes:
To install laminate flooring around pipes, take a drill with the same diameter as the pipe plus16-20 mm for the expansion. Make a straight cut across the plank intersecting the center of the holes, place it on the floor, glue the pieces and keep it with a clamp (don’t stick the laminate flooring on the floor).
As the laminate flooring installation has been completed, cover the expansion spaces with pipes circles. Seal around the water pipes using silicon sealing.(Fig. 12).
Note: To replace a tile probably have been damaged, pick the last tile installed 3 cm until it opens.
Do not engage and disengage more than 3 times. Continue opening tiles until reach affected tile, then replace it and reinstall tiles.
– Clean laminate flooring with vacuum cleaner, soft brush, or piece of damp cloth. Do not use steam cleaner. Before cleaning with a damp mop ensure to clean the laminate flooring with a vacuum cleaner.Clean the floor in the same direction of the planks.
– Avoid flooding the floor with water or using strong detergent.
-To remove stains by using acetone, alcohol, etc.always apply the solvents with a cloth and never directly on to the laminate flooring. Use mild and noncorrosive detergents. Never use wax or varnish coating, the use of these cleaning products might damage the floor and exclude it from guarantee coverage.
– Place protective pads beneath furniture legs. Provide a suitable doormats and rugs at both sides of an exterior door.
– Use suitable curtains and rearrange furniture and rugs periodically to avoid uneven color and shade changes from light exposure.
– Don’t place flower-pots directly on the laminate flooring.
Flower-pots should be placed on shelves or supports with a proper height from the floor. Avoid placing heavy objects on the laminate flooring within one week after installation.
“BY CLEANING AND MAINTAINING PROPERLY YOU WILL RESERVE THE VALUE OF YOUR LAMINATE FLOORING FOR MANY YEARS.”